12.26.2016

Cutting Bottles

I prepped a few beer bottles today. Possibly for some man candles down the road. I'm definitely getting better at this. I still break a few but for the most part I get decent results.

I also use some diamond sanding pads to clean up the edges. Here's the stack I made today


12.25.2016

Merry Christmas!

Merry Christmas everyone! Enjoy the day! And make 2017 the best year yet!

12.19.2016

Barnwood Builders

Its after hours and I'm still up watching some tv. Right now I have the DIY channel on, watching episodes of Barnwood Builders. Such a fun show! It's great to see old craftsmanship appreciated! I know that what I do in the garage is nothing like what they accomplish on the show but it is really fun to watch someone who appreciates wood working the way I do. Our forefathers definitely were creative and I am so glad that people out there are working to keep those skills alive by restoring old works of wood like barns and log cabins. It is impressive to watch.

12.18.2016

I Got Orders!

My hobby of making stuff is making me money!

I like to create because it's fun. But people have been commenting and asking for custom pieces for themselves. We haven't settled on pricing , but I'm glad just to get some traction.  I need to get to work! Pictures to follow!

good night!

12.15.2016

Thursday's Gone

So another day down, and this is a much needed day off. Off of work, and a break from projects. Although I am doing some writing and some research.

One of the main reasons for this is that I smashed my hand at work, got a good number of stitches and a little stiffness. Although at the time I said to hell with it, grabbed some superglue, poured a healthy dose into the gaping cut, held it shut with tape, put a glove on and kept on working.

Ten hours later I realized that this was only a temporary fix, even though I do love super glue.

The doctor did a fantastic job of sewing me back together after she scolded me for waiting so long to come in.

In that light, I don't want to over do it, and I will stay away from anything too rigorous for the next few days to keep the cut clean and my hand rested.

So after some household clean up, and some tool maintenance, I am just blogging and taking it easy.

Tool tip of the day: don't worry if you totally chip up your hand plane blade, it can be ground back to a nice straight edge and resharpened. As I had to do today, once I took a peak at the blade on my block plane. Chipped in about 4 places. But back to awesome with the right maintenance.

Alright folks, Thanks again for stopping in to check out the blog. Please take a minute to leave a comment on any post that you like, if you so please. Even though I am using the Blogger platform to host this blog, I do have the commenting feature set up for any user with or without a Google profile. It should be working. If it is not, please use the contact form to the right and let me know! I will fix it ASAP!

Also, feel free to leave your own links in the comments. If you have a blog or a Pinterest or a YouTube channel with projects and ideas that you want to share, POST IT!

Thanks again , and have a great night!

12.13.2016

Pallet Chest

Here's my first attempt at a pallet project from months ago. I never posted it, but it didn't turn out too bad

Originally this was going to be a different piece all together. But like I said, live and learn. It was an early attempt and I did not know all the tricks to working with pallets that I do now.


Here's a few things I learned, in no particular order, based on this attempt.

Choose the wood carefully. Pallets are so irregular that you can't just mix and match without some forethought. 

Buy a hand plane. Or an electric planer. Sanding takes a long time. You can really get a lot of the preliminary work knocked out in a short period of time if you plane the boards first.

A mulitool is worth its weight in gold. Those weird cuts and unforseen details, well, something like a Fein, or a SonicCrafter will make quick work of the problem.

Decide early what kind of look you want. Pallet projects can be anything you want. Rustic to fine finished. It really depends on what you want, the wood you are using and your skill level.

Staining is not as easy as it looks. Figure out a stain and an application method before hand. Test on scrap wood. I brushed on the stain, then brushed on another stain over top. Then I sanded it back down because it was just too dark. The final look really isn't bad, but I was a definite beginner in the world of wood stain before this project. Looking back I would have chose a different stain, and rubbed on with a rag to really get the look. It would have saved me a lot of time.

So even though I am not happy with the overall project, it does serve the purpose without being too much of an eyesore. It hides toys in the play room as a make shift toy box. With the lid closed, the dark color of the chest tends to hide in the room so to speak. So all in all, it is a win. Just not the win I had in mind. 

This particular box is about three feet wide and almost 2 feet deep inside to give you a frame of reference. It took wood from about 4 pallets, mixed and matched.  And that ties in with the final lesson learned: Have many pallets on hand. You never know what you will need for sure until you need it!


12.11.2016

Pallet Trunk Chest Update

Well like I mentioned, I am less than thrilled with the results of the top of the chest.  However I would be negligent if I did not at least show the project to this point. Keep in mind this is before any final sanding , filler and stain. Either way I'm pretty sure I will change it entirely before it's done. Here you go:


Sunday is A WASH!!

Today was a disappointing day for projects, but I am going to chalk it up as a learning lesson. Not everything is going to be perfect every time. And many times, it won't be.

I finished the trunk chest, minus the hinges and some stain work, stepped away, and I was just not happy. The lid piece which has given me so much grief just did not look right.

Now, it doesn't look bad, and possibly I could finish up the chest as it sits, call it a day, and see if someone on craigslist will want that piece.

But I am going to opt for a more labor intensive option. Rebuild the lid, using a different design and with some more time and care. Just to get something that I can feel good about.

I'm pretty bummed with the way this day turned out. I had a block of time, and rushed to make the most of it.

Well, haste does in fact make waste, as I was reminded today.

Crap.

So not pictures to show. The project deserves to be done right and I will put in some time tomorrow to make it so. I just want to see it look proper.

With this failure, I also have lost the wind in my sails to do anything else tonight. I don't have the creative energy for much more. and I need to just brain dump this day, and begin anew tomorrow.

I'm pouring a Crown and coke, and calling it a night.


Saturday Update

Tonight was a tough one. Trying to get to work on the pallet trunk chest was just a non starter.

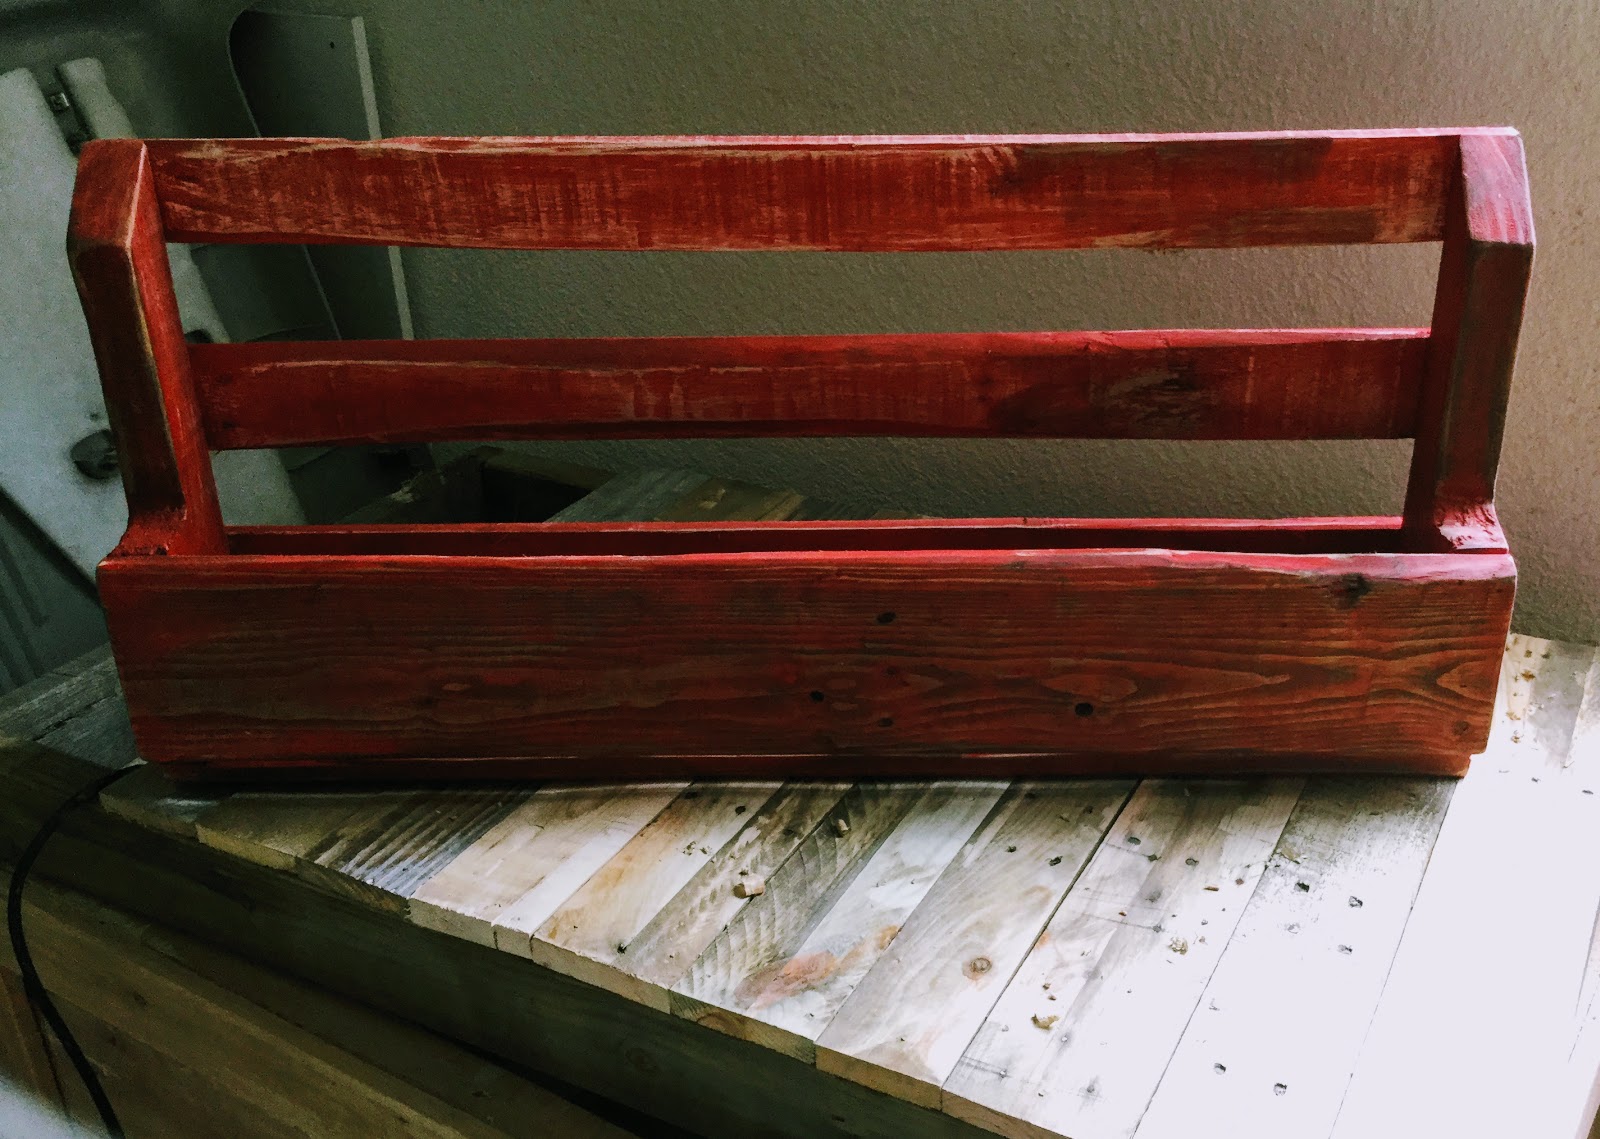
Not to say I didn't get some progress done. In fact, I did basically finish the chest, minus the final sanding and trim, and the stain. OH and the hardware for hinges and what not. So I guess the truth is, I finished the wood working portion. I just have to go clean it up.

I felt rushed, because I also put in a long day at work, came home, got the family settled and then headed out to the mancave, aka the garage, only to suffer from numerous interruptions. I hastily threw together the rest of the pieces needed on the chest, and began my final cuts. I broke one board after it was set. I cut too deep on another. All in all, I messed up.

So the challenge now is to do the true DIY thing and fix what I have in front of me.

The professional might scrap the project and rebuild it correctly. I think I can do enough sanding, carving and planing to hide the mistakes. So that's the route I am taking. Ill let you know how it comes out. Truthfully, I am not all mad. I used some really old pallet wood for the rest of it. But once I planed the boards down and scraped off the weathered outer layer of wood, the board underneath was something special. I think that alone will make up for the mistakes I made.

So that was tonight. I have my work cut out for me on my day off tomorrow. So expect some pictures soon. And you know what? The worst thing is not even that bad. Because I am learning all the time. The next project will come out even better. And the next. And you know I don't intend to stop making stuff.


On my way home from work I passed by some of the big box stores and drove my truck around back.  Filled my truck bed with new pallets to add to my stash. There are more projects in my future now. I have the material! I just need to make the time!


Now, on a not so great note: I did film two videos. Unboxing some new tools. But I currently don't have access to those because they are on my Ipad. And I am working off my computer at the moment.

However, I already began the editing in iMovie in order to put those two short videos together, and will be posting them on the blog soon.


So what else? I am just ranting, with no real objective in mind but to update on the project front.

I did use my new hand plane. It was not too bad. I'm still a fan of the bench plane, so keep that in mind if you are shopping for your first hand plane. Its not a bad size and shape for most beginner projects. And like I mentioned, once I ran the plane over some of those old boards, the beautiful wood underneath came through with the grains popping and the color shining. I am more than satisfied. Some good sanding will finish it up nice. All is well on that front.


Besides building my projects, which admittedly take much longer than they should, I have been writing. I have two other blogs that I am working on. Both of them I use the free platform from Blogger. I don't care if they get readers and I don't care if they get views. The real reason I have those pages up is for me to continue to work on ideas and work on my creativity. Like I told my son today. Do ONE idea each day. Doesn't matter if it sucks. Because You don't have to show anyone. But if you do one a day, eventually you will have that one great idea. And that could be your golden ticket.

It's akin to walking a hundred miles. It all starts with a step. Followed by another. Eventually you make it. But not without putting in the work first.

So like Malcom Gladwell said, ten thousand hours here we come!

I'm putting in the work. And at a minimum, I hope that by reading this blog you can be inspired to put that work in too.

Because you may have that great idea somewhere inside. That perfect project, or that masterpiece. But if you never start, we will never get to enjoy it.

So please keep creating!


I'm going to take a breather and finish tonight's drink: Sweetwater IPA. Not a bad beer for a Saturday!

Thanks for stopping by!


12.09.2016

The Best Time To Write

Trying to maximize the creative potential of the mind is a challenge that I have not totally mastered.

I am fascinated by the work ethic of successful artists from all genres, because of the process by which they create. Through many podcasts, blogs and other media, I feel I've learned a few things.

For some of the ones I admire most I can see their process unfold through their art.

Doesn't matter if it's stand up comedy, music, or fine arts. What I can see and what I feel comes through their art is hours of work before the final product is on display.

They've spent hours writing or creating before we get to see the result. And I'm sure they have thrown out more work than they have finished.

It's part of what I found in my own efforts too. Not everything is perfect the first time around. But the real work is in the rough drafts of the project before the masterpiece is made.

This blog is not just a hobby or a venue to showcase my projects. I mean, yes, it is those things too. But it's also a medium for me to work on my own creativity by writing and forcing my mind to create.

So when is the best time to write? For me it's always been very very late at night. With some peace and quiet and my mind open.

What do you think is the best time for you to do creative work?


12.05.2016

First Woodburning Attempt


I'm not totally happy with this but it was my first try. It is far from perfect but I'll keep practicing


12.01.2016

December Update!

This is another slow week for my projects, because life happens. But that doesn't mean I want to neglect the blog.


We've finally entered into December, which is officially holiday season. I know Christmas kind of swallows up the other holidays with its commercialism but it certainly doesn't have to be.


Gift giving and holiday decorating doesn't mean spending lots of money. My take is that the best part of the holiday is the creativity. The special recipes, the crafts, the thoughtfulness that goes into the gifts we give.


So making something to give away should really carry more value than purchasing something expensive to give right?


So I want to take advantage of the next few weeks to put some work together to give away. Of course I'll be sharing it here on the blog. As always, I'd love to hear the feedback, and if you like it, please click one of the share buttons below!


So here is a short list of some of the stuff that I will be posting soon:


An unboxing video of my new wood burner


An unboxing video of a new handplane


The next phase in the pallet trunk chest


A new rustic variation of a pallet trunk


A video description of cleaning a pallet for using in projects,


And most likely many more!


I'm really behind on my beer reviews and I apologize! Today I'm on Gatorade and water thanks to the flu, but that won't last forever!


Thanks for stopping by!


11.24.2016

Dealing With Creative Blocks

Sometimes the creative block hits me. What I mean is that no matter how much I want to create something, the juices aren't flowing and the process is slowed. My best strategy is to just workthrough it . Not every day is a great creative day. But waiting for the right moment is unpredictable.


Free Twitter Followers

So what do I do in those moments? Make something anyway. That next project may suck but it's the same as training through injuries and fatigue. Eventually things will fall into place.
Have a hot cider and rum in the meantime


Happy Turkey Day!!

Today all the creative juices will be spent in the kitchen. My drink of choice is a tumbler of Crown Royal.


Happy thanksgiving everyone!

11.23.2016

Side Gigs Online

You know by now that I am all about creating things, and it goes well beyond the projects that I have done so far. I love seeing other people do the same. So as a way to support that effort, and to create a side revenue stream for myself in the process, I jumped on Fivver to see what I could do.

If you have never taken a minute to peruse Fivver, take a minute to check it out.  It's an online freelance marketplace that helps guys like me find work or services on the cheap.

You can find someone to do just about anything for you on the site, and on the flip side, you can offer your own services at a price. And it can be very easy.

If you have something to offer give it a try, and see if you can land a few bucks. Or if you need some help on your own projects, there is probably someone on Fivver who will do some work for you.

Here's a link to one of the gigs I've been making money on lately: Here


11.17.2016

Lighting Room With Pallet Decor

Here's a stained version of the candle sconce. I have made a few variations, but with the lights off and the candles lit, the room really feels warm with this pallet art. Enjoy


Pallet Kitchen Decor

Well a while back the wife said she wanted an Americana themed kitchen. It's a work in progress but this is her birthday week, so I had to make sure to get something done.

For this project I used wood from two different pallets and a dowel rod. I went back to using the forklift cutout pieces of the pallet to get that look on the struts of the rack.


You'll notice that the wood is less than perfect in a few instances, and that was on purpose. I wanted something that had the imperfections. Something that would look old and have the feel of something you might see in an old farmhouse. Or Cracker Barrel. Lol.

Stain was minimal too. A light stain rubbed on with a rag. I only used a brush to make sure seems and cracks got color on them.

As always, this piece is a little heavy, so four toggle bolts keep it in place on the wall.


Hope you like it. Leave me your thoughts and questions below!

Order Updates-I'm using Venmo!

I'm already a few weeks into my 40s and I've done my best to keep up with the worthy technology. Some of it I will never adopt, but there is some good stuff out there.

That said, I am adding a Venmo account to accept payments for projects and orders. I still have my PayPal account as well, and I never turn down green hard cash either. But paying for stuff really should be easier than it is. I've had local buyers flake on me or even try to haggle after a verbal deal is made. I understand the art of a deal. And for projects that I make, they also must realize the time it takes to make something. For a unique handmade piece, I only ask what is fair. 

So that said, here's my Venmo info: @Nathan-Graybill 

It's an easy service and I want to make it easy. Meanwhile, I'll get back to working on a few projects !

Use the contact form on the side, or leave a comment if you would like something made just for you!


11.16.2016

Wednesday Update

I've been working long hours at my day job so the projects are a little slow...BUT I did complete a great pallet project piece that I will showcase very soon. Once the stain dries I will snap a few pictures.

I also have been working on tuning up my drawing skills. I have a few sketches that I've been working on and those too will get posted shortly.

My thoughts on the building and brews lifestyle? Always work on something, even if time is limited. Draw a sketch when you have a second. Jot down a note or a blog post even if it's short. Get something made, and always be creating. Motion creates motion.

Sometimes it's work. It's a process. But just keep moving forward.

Goodnight all!


11.11.2016

Planning Out My Home Decor

I think a lot of Americans are at a point where their home decor is coming full circle. That 70s look is definitely dated, that 80s look was drab. The 90s and the 2000s didn't have much to offer, aside from something called "ultra-modern", which, if you ask me, is ultra boring.

So that rustic and worn Americana look is back in full force. And I kind of like it. 

It brings some familiarity, along with a homey comfort that was missing with the other afore mentioned styles.

Part of this style is the salvaged and upcycle design that I love. Which is why I am so jazzed on pallet projects.

Wood brings another layer of life into the home. I mean after all, wood is alive. Or was alive? I'm not totally sure. Trees are alive. Wood comes from trees. You do the math.

So what I'm going for is a rustic beachy Americana look. It's going to take some time. But that's part of the fun. 

Today was no exception. I was working on a pallet creation for the kitchen. Photos to follow once I get it done.

Of course I still have some half finished projects that need finishing. Buckets full of shells from the Florida beach that need to be used in something....I haven't figured it out yet. Some blank canvases that need painting. The list is long.

So the work in progress will be "in progress" for a long time to come. And truthfully, once it's done, it may be time to change it again. So the work continues. And so will this blog. 

So I'll finish up this Pabst Blue Ribbon, and get back to work. Tomorrow. Today I'm punching that proverbial clock and turning in. Goodnight all!


11.09.2016

Late Night Rant

It's late but I need to get a quick post up on the blog.

Partly because I have been swamped with work, and family time, which cuts into my creative hobby time. That means I don't have any new project pictures to share. And I feel guilty about that.

But what I have been doing is prepping for that moment when I do have time to create more. For example, the family and I spent all day yesterday on the boat and on a nice little island beach not far from home. I put my oldest son to work collecting shells and driftwood. Why? Well I'm sure down the road I'll need those things for some craft projects.

He did good, and now I have a nice collection of shells from beautiful Florida to use in my home decore. Project photos to follow. Let me brainstorm an idea and I'll get that up on the blog.

I also spent some time chatting with my sister across the country. We discussed our creative processes and I mentioned to her that I have this blog to showcase my hobbies. And more than just physical art and projects, I also began writing again. In fact, I wrote a first draft to a short story which I threw up on my other blog( it's still in the works, but I'll give you the link here ) So check that out and leave me some criticism if you so please. http://fyrstories.blogspot.com/

I love to draw and paint but it pains me to say I don't have any new pieces to share. I did spend some time collecting photos that inspired me. I do that regularly. If I see something I like, I snap a pic so I can reference it later.

The creative process is ongoing. Never stop learning and never stop creating.

Thank you all for checking out the blog. Leave a comment below!!


11.06.2016

Sunday Update


It's late on a Sunday and it's time for an obligatory blog post, since I've been neglectful for a few days. Work life is great which means time for side projects is limited. I do have a few pieces in the works though. Hopefully this week is a little more forgiving and I'll have some pictures of final projects to share.

On the list of pallet projects, I have a few great pieces that I'll probably end up keeping for my own home. A pair of candle sconces to hang on the landing of the stairs is almost done. For those I found a perfect pallet that had really took some abuse from the Florida sun. Once I sanded it down, the grey wood had a nice boathouse look. I'm excited to get those on the wall and burn a few candles on them, it will bring back that Americana beachy feel to my home

I've also got a great pallet fresh off the mill that I found behind Staples, that I will promptly turn into a liquor bottle rack and coffee mug holder. I know, I know, it sounds like two things that don't go together but the finished product will change your mind.

Beyond that I've got some art that needs creating.. I'm trying to master the art of ink drawing , which is a favorite style of mine. Comic book art holds my fascination.

So that said, I'll be posting some updates soon. Thanks for checking out the blog. Comments are welcome!

11.02.2016

Rustic Wine Bottle Rack


Rustic Shabby Chic Bottle Rack
For the beverage connoisseur I made this little project. Total time, less than a day. Two days in all when you factor in the paint and sand job I did to give it the shabby look.


The pallets you find with the cutouts for forklifts are the best, because they give the variety to your strut boards. I mitred the ends off, and sanded them down just enough to make them smooth.

I purposely found wood that had a few nicks and blemishes so the whole thing would have that farmhouse look. I didn't want this to be anything but rustic. Not totally my style, but I can appreciate it. Also, I promptly posted this for sale so the end customer in mind who is looking for something like this is my target consumer.

All in all, it was as easy at it looks. I did take a bench plane to the face board to scrub it down so I didn't waste all day sanding it. A few passes with a sander and it was good to go. I also ran the plane over the edges at an angle to get that bevel look. Another few passes with the sander at they rounded out just right.

Next I took a can of apple red paint and poured it in a solo cup, added some water to thin it down to a stain and brushed it on.

Aside from the face board, I didn't sand much on the rest of the wood before I painted. I wanted to have something to sand off after the paint dried.

The thin coat of red looked great after it dried, so I took my oscilating tool with a medium sand paper and ran it over the wood.

The unsanded boards came out great, as the rough parts sanded off, the grain was left stained red, and a little wood is showing. I think that really made it pop.

I also sanded along the edges to expose some wood and really get it to look old and worn.

Usually I would say to sand by hand after painting but I think I managed to get a feel for using power tools with just enough pressure to get the look I wanted without going too far. .

A few hours down and I'm all set.

Here's the finished product


If you love it or hate it..leave a comment below!

11.01.2016

Tuesday Update

Today wasn't too forgiving so getting projects done was next to impossible. But I still made some time to get out to the man cave, also known as the garage, and plane a few boards for an upcoming project.

I'm motivated because I've got some buyers for some of the pieces I've made and requests for more. The best part is, I can make more stuff without worrying that my own home will fill up with my creations. Oh, and of course selling the stuff means money in my pocket. Always a plus.

I looked into making an Etsy store, so that is in the works. So look forward to some shameless stuff plugs once I get that set up.

For now I'm listing my stuff for sale locally on facebook groups and Craigslist. Of course that doesn't mean I can't ship something if you want it. Just send me a message and I'll take care of you.

Hope everyone had a great Halloween, and now we are in no shave November. Let it grow gents, let it grow!

Have a great night!


10.31.2016

Where To Get Free Pallets

Pallet projects have become a passion for me lately. I have always liked woodworking but something about upcycling a beat up pallet is especially satisfying.

I always have about 10 pallets in my garage at any given time. And as I use them up, I'm on the prowl for new ones.

If you are getting started on pallet creations you might be wondering where to get them.  Not only that, but in most cases, one pallet is not enough. You will probably need to salvage pieces from multiple pallets to get the wood you need for any one project.

That's part of the challenge and part of the fun.


So where can you get enough pallet wood?

My go to source is behind stores. And I don't just take them, because I've learned that's bad etiquette. Some places prefer you don't take their pallets because they have an exchange in place. You'll be messing up their system.

So big box stores are usually a no go.

Smaller businesses are the best. They might have ordered some freight and just need to make the pallets disappear.

If I can catch an employee out back on break I'll ask if it's ok to load a few. If I get the green light, l load up my truck.

Through the course of the day I'll keep my eyes open for new places to salvage.  Better still if I see pallets next to a dumpster. That's a free for all. Plus, there might be other great pieces to salvage in the trash. Upcycling goes beyond pallet projects.


My second source is on Craigslist. There are plenty of people looking to clear out their business loading dock and need someone to take those pallets as a favor.

Make a mental note of the hotspots for salvaging. Apartment complexes dumpsters, the back of strip malls. Pretty soon you will have more material than you can handle. All that is left is to turn it into something awesome.

One of the best feelings is creating a piece from 100 percent salvaged material. It's almost a badge of honor.

Occasionally you'll need to buy some odds and ends to bring the project together. But in the spirit of keeping things green, challenge yourself to make your project from purely salvaged material.

Good luck! And send me some pics of your own work!


Candle Sconce

Here's a very quick project that's still pleasing to the eye.

A rustic pallet board wall sconce. Mount this in the location of choice and add some candles.

I didn't stain this piece, because the boards were so old and worn, I felt just a sanding would give the right look. Here's what I got:


The worn out, distressed wood gave it the beach house feel I was going for. Sometimes less is more.

Questions? Leave a comment!


Use the contact form in the sidebar if you'd like a custom piece made for you 


Free Website Visitors


Tonight's Beer Review

For tonight (and most of the day!) the beverage of choice was an American standard. Cans of Pabst Blue Ribbon.

I might catch a little heat from beer aficionados out there, but I like it. It's not ever day that I crave one particular beer over another. And today, PBR did the trick.

For the few of you out there who have yet to try it, it's a light lager. Not a light beer as in your standard light beers. I mean it in the sense that it's not a heavy beer.

It's clean and simple. To me it feels just a tad lighter than a traditional Budweiser.

There's some advantages to sipping on a beer like this.

For starters, you can enjoy the taste of beer all day long while you sip away, and not worry about falling down drunk.

And second, because the taste is not as powerful as some of my regular favorites, it's easy to pair with spicy food. Which I did. The wifey cooked up some traditional pirogies and kielbasa.

Successful Saturday so far. A few projects started, some others under way.

I'll be back soon with some updates on my creations, so check back!

Leave me a comment below. What's your go to beer while working on a project?

10.30.2016

Doodling Again


Tonight's sketch came inspired by an awesome short story on Creepypasta.com:

Jawbone from Candle Cove


That's my interpretation of the character Jawbone from Candle Cove.  I think I'm getting better, but definitely need some practice. Enjoy.


10.29.2016

Support the Cause!


It's not everyday that I will dedicate a post to one of my affiliate partners, because the main purpose of this blog is content. But when I come across something good, I share it. A lot of these products are among the best out there. I tried them, and I can say with confidence that I'm happy to give them a plug. Check it out. See if it will work for you. Message me or drop a comment if you have any questions. 
-Nate


brain quiz


Review of Sierra Nevada Original

Time for a beer review. After all, this is a beer and DIY blog, and up until now I've neglected the beer!

Aside from a quick snapshot of some home brew IPA I had going, I have utterly failed in spreading the love when it comes to the bubbly bitter goodness.

Well, for tonight, as we wrap up the week and kick off the weekend, let's pop a top of one of my favorites: Sierra Nevada original.


I'm a west coast guy, even though right now I'm deep in south Florida, I'll never get past the great IPA culture of my home state.

Now most of the time, I'd opt for the hoppier, Sierra Nevada Torpedo. But even though the original has a lower Abv%,  a modest 5.6 percent, the clean taste makes up for it.

And for the uninitiated, it might be more than enough alcohol to make the drinking expert men well worth it.


If you are a beer drinker, but have yet to dabble in the IPA realm, let me offer some advice. Every beer has its place and time. A good hoppy IPA like this is meant to be sipped slow, and enjoyed cold.

So take a seat and turn the game on. Pop the top, and get back to creating tomorrow.

Goodnight all! Peace!


Joe Rogan Is Onnit